31 August 2011

A swag of bags...

Since my big clean up a couple of weeks ago, I have not been able to find ANYTHING!! So, I have just been opening boxes of stuff and trying to finish the unfinished, before starting something new. We'll see how long it will last...... LOL!!


These bags started as a pre-printed cot bumper but ended up being the cutest little baby "essentials" gift bags for new mums. They have different prints on both sides. It is a light cotton, so I lined them with a light blockout curtaining. Not only does this give the bag support, it makes it almost waterproof inside. I also added a strip to the inside of the handles for the same reason. As they started off curved, I have topstitched the curve onto the striped fabric, squared up and treated as one piece. I was limited to the amount of stripe  so I had to use it sparingly. Finished size is about 40cm x 30cm.


This bag was a panel from a curtain that someone carefully cut out. I decided to use these as a library bag. It is fully lined in yellow cotton and the panels have a light batting to give support. I think it turned out great and soooooo easy!!!!


These are a couple of older library bags and pencil case sets I made for Santa's Workshop. They started out as blockout curtains. These didn't need to be lined as the fabric had enough support on its own and the seams got overlocked instead. They were filled with stuff for back to school.

So easy and so much fun! If you can draw a square and sew a straight line, you can make one of these bags!!

19 August 2011

Odd request...

(I apologise in advance to anyone who may be offended by this post. It is intended as a tribute to a wonderful person and is in no way meant in disrespect to anyone who has passed on....)

Since the cruise was already booked, the passport updated and clothes ready for the trip, it seemed only fitting that she should still go, albeit in the hand luggage. And who wouldn't want their mum to be looking her best when basking in the sun or lazing by the pool?? And there is always a need for glamour at the Ball or dinner with the Captain. For this reason, we couldn't help ourselves, planning outfits for any occasion that may arise....

Casual Summer Dress
 
For the Casino

Ball Gown

Front

Swimsuit


There are several accessories to go with these outfits, such as glasses, hats and tiara. She will definitely be the best dressed urn on the ship!!

09 August 2011

One quilt finished...

This is the single bed unfinished quilt top, fully quilted and ready to go to a new home.

 Here it is on a single bed...

Close-up of the quilting. Pretty basic lines, but works. 


Ted E Bare wanted to get in on the action. Nighty night, Ted....


07 August 2011

Chinese New Year Dragons 2009

My Store Manager approached me to make a couple of Chinese New Year Dragons to "leap" across the Asian Food Aisle. I accepted the challenge....

Step 1 - How am I going to put this up??
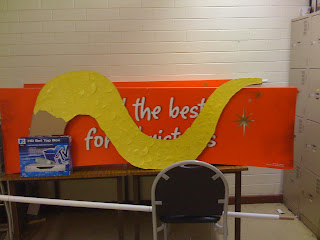
Solution - recycle the Christmas display material. Tried to paint over it but was not successful, so decided that we would buy red wrapping paper and use that.

Step 2 - Find a Design I found this colour-in drawing at an online educational ideas site and thought it would be perfect. Simplified the design, and focussed on the head. Planned on using foam pieces to 3D the parts, like paper tole, to give it some depth.

Step 3 - Test the body size and shape
Decided to put scales on using separate pieces of sparkly paper shapes. This gave it great texture in the light.


Step 4 - Create the head and legs
I was fortunate to find a pattern for some dragon legs while I was hunting for designs, so did some tests for sizing on the floor. Drew the tail sections freehand.

Its starting to look OK to me! Full steam ahead!!

Step 5 - The Head
I split the head pieces into colours and using heavy card, cut out each piece. Decided that the head needed 2 layers, pushing the nose and mouth piece further forward to create depth. I would add some more depthe at the join of the head. I used double sided tape to stick the foam pieces in between, as I thought this would be more successful than glue.

Step 6 - Test fit
Once I had all the elements done, I put it on the floor to see how it looked from a distance, adjusting the spines and position of the legs until I was happy with the layout.       

Step 7 - Putting it all together
I had to make this at the store as it would have been too large and cumbersome to transport whole, so two of us laid it out in the staff room and got sticking!!


This is the final results. I think they were just fabulous!! They stayed hanging there for over a year until a lady said her daughter was scared of them and they had to come down. Unfortunately they ended up in the loft and the new manager threw them out without me knowing or I would have saved them!!

And here is a picture of me with my creations.... Enjoy!!

05 August 2011

Martha Nelson Thomas - Doll Babies

I discovered the Doll Babies a few years ago, when I bought one for 50c at an Op Shop. I thought she was a CPK clone, as many people do, but after doing some research I found that she was actually designed BEFORE Xavier Roberts, not after!! Unfortunately, it turns out, Martha Nelson Thomas (MNT) neglected to copyright her designs, and as a result, lost out on a FORTUNE!!

Anyway, here is my original girl. She is crude by CPK standards - more boxy in shape - but you can see the design elements definitely coming through.  Mine wears a OOAK outfit with fluted edges done on the overlocker. She is hard to dress, since she is just a square with arms and legs! I have taken her apart and re-shaped her, as her original creator did a poor job of it. When I had her opened up, I could see the markings inside the head and tags, and documented them for future reference. She is an original purchased and sew-at-home body. Her hair was plaited into mini dreds, so when I undid them, she ended up with a wicked crimp!!


The heads were originally soft sculpture - as were the CPK's - but were released in a do-it-yourself kit at around the same time as the launch of the Cabbies. Bodies were sold "pre-sewn", heads sold separately. Just some simple seams and you had your own baby! Pattern books were also published, as well as manufactured clothing and shoes. I have since purchased a selection of heads, in various sizes and colours, however I have yet to get my hands on a clown. Its on my wish list!!

Some other Doll Babies I have made :


This guy is smaller than the original, kinda like a preemie. I used some stretch fabric that I dyed to get the dark brown colouring, and a pattern that was graciously provided by the lady I bought the heads from. He is a favourite for sure!


This is another full sized body I made - not from the original pattern (although I do have it in my bookcase). The body is more CPK than MNT, which gives him much more shape. Need to tweak the arms and legs a bit, but I think he was a success. Just needs some clothes, now....


A selection of my MNT Doll Baby stuff. You can see the size differences, with the Doll Baby, Little Doll Baby, Tiny Doll Baby and the Teeny-Tiny Doll Baby kits. I've got a lot of work ahead of me if I'm going to use up all the heads I have!!